Articles in this Series
Preparatory Steps
Basic Classification (1/4) - Classifying Clothing on the Mac Mini M1
Basic classification (2/4) - Tensorflow Lite Model Conversion (this article)
Basic Classification (3/4) - Machine Learning on TI's EdgeAI Cloud
Interlude: TensorFlow Models on the Edge
Basic Classification (4/4) - EdgeAI Cloud - Jacinto ML Hardware Acceleration
Classification on the AI Edge
(5) SK-TDA4VM:Remote Login, Jupyter Notebook and Tensorflow.js
(6) SK-TDA4VM Starter Kit: Fashion Classification DNN
(7) - Category List
Introduction
In the previous article, part one of the series on basic machine learning on the SK-TDA4VM Starter Kit, we trained a machine learning model to classify clothing, using the MNIST Fashion dataset. Although, the classification was performed on a Mac Mini M1, simply to test our code, any PC would have sufficed for the task. In all subsequent parts of this series we will be using the same or slight variations of the same code to perform the same classification, leading up to an implementation on the SK-TDA4VM. A summary of the model used in the previous training and classification exercise is shown in the Figure, below.
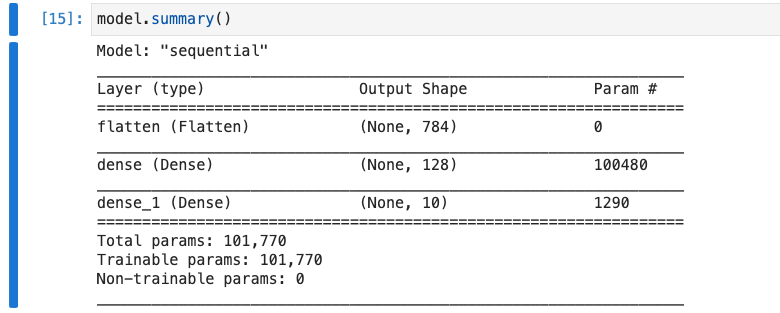
Figure: Summary of the TensorFlow Fashion MNIST machine learning model.
The TDA4VM's C7x and C66x DSP Processors
Now, the Jupyter Notebook developed, during the last exercise, should and could be run on the starter kit. Although, it would only utilise the kit’s CPU, that is the dual ARM Cortex-A72 processors. However, the purpose of this series is to use the starter kit on the AI Edge, executing inferencing tasks, as quickly as possible. On the artificial intelligence Edge we want to utilise the kit’s 8 TOPs hardware accelerators.
TensorFlow Lite is an open source deep learning framework for on-device inference. It provides a set of tools that enable on-device machine learning on embedded devices and systems, allowing them to run specialised trained models.
Hence, it is required to run machine learning inferencing on the TDA4VM’s C66x and C7x DSP hardware accelerators. One way to delegate the workload, to utilise the hardware accelerators, is to convert the machine learning model (developed in the last part of the series) into a TensorFlow Lite one. The process of converting our 32-bit floating-point Tensorflow model , which uses the A72 processors, into an 8-bit unsigned integer Tensorflow Lite model that delegates inferencing to the C66x and C7x DSP accelerators is the topic of this article.
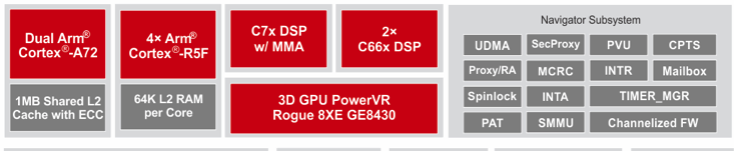 Figure: The TDA4VM processor consists of a number of processing units. The C66x and C7x DSP processing units are required to achieve machine learning inferencing performance of up to 8 TOPS.
TensorFlow delegates enable hardware acceleration of TensorFlow Lite models by leveraging on-device accelerators such as the Graphical Processing Units (GPUs), Digital Signal Processor (DSP) units and edge Tensor Processing Units (TPUs).
Implementation
In this Section we proceed in converting our machine learning model in the following manner. Firstly, we perform the same model training exercise, as before. Although, this time we do so less elaborately, as now, presumably, we have some inkling as to where we are heading. Next, we convert the model into an 8-bit TFLite model, after configuring the TFLite model’s optimisation mode parameter. We can optimise our model for speed or size, in this exercise we choose the former. Finally, we test the newly converted 8-bit TFLite model in a TFLite interpreter, which is made available as part of the Tensorflow tool suite. The Tensorflow to TFLite conversion workflow is summarised in the flowchart, shown in the Figure, below.
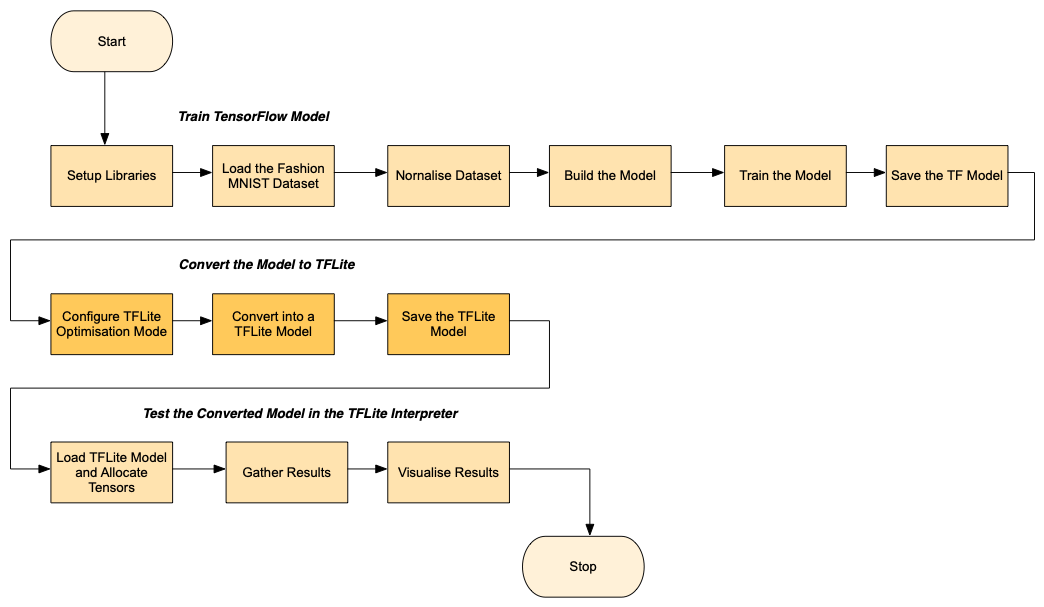
Figure: Flowchart Tensorflow to Tensorflow Lite Model Conversion.
Results & Observations
In this section we carry out a brief analysis of what has been achieved, so far. A simple TFLite model has been created that has three layers, as shown in the model summary figure above. The Tensorflow tools can be used to export the deep learning model to file. The directory structure of the saved Tensorflow model is shown in the Figure, below. It will be shown in the Jupyter Lab notebook, further below, that the exported TFLite model is about 90% smaller than its Tensorflow model equivalent.

Figure: Saved model file structure.
The classification accuracy of the TFLite model, in this instance, is only slightly less than the full blown Tensorflow one. Previously, the accuracy of the Tensorflow model was reported to be above 88%. Likewise, the accuracy of the TFLite model fluctuates, between 84% and 88%. It’s left to be seen how the accuracies compare, when we develop and use more complicated models.

Figure: The TensorFlow model accuracy is roughly the same, as the TFLite model accuracy.
The steps outlined in the flowchart, in Figure above, are implemented in the following Jupyter Notebook. Extensive metrics on all models and inference platforms used will be presented and compared in a future article.
Conclusion
In this article we have converted our Tensorflow model for classifying clothing, trained with the Fashion MNIST dataset, into a TensorFlow Lite one. In the next article in the series we will use our newly converted model on TI's Edge cloud server.
Jupiter Notebook Implementation
Below, we create our first Tensorflow Lite classification model.
Fashion-MNIST is a dataset consisting of a training set of 60,000 examples and a test set of 10,000 examples. Each example is a 28x28 pixel grayscale image, associated with a label from 10 classes.
# TensorFlow and tf.keras
import tensorflow as tf

# Helper libraries
import numpy as np
import pathlib
import matplotlib.pyplot as plt
from os import getcwd

print('\u2022 Using TensorFlow Version:', tf.__version__)
print('\u2022 GPU Device Found.' if tf.test.is_gpu_available() else '\u2022 GPU Device Not Found. Running on CPU')
• Using TensorFlow Version: 2.6.0
WARNING:tensorflow:From /var/folders/63/v159h8tn0z5ftm22jjc_gqkr0000gn/T/ipykernel_30060/3343207959.py:11: is_gpu_available (from tensorflow.python.framework.test_util) is deprecated and will be removed in a future version.
Instructions for updating:
Use `tf.config.list_physical_devices('GPU')` instead.
• GPU Device Found.
2021-11-06 15:15:27.451171: I tensorflow/core/common_runtime/pluggable_device/pluggable_device_factory.cc:305] Could not identify NUMA node of platform GPU ID 0, defaulting to 0. Your kernel may not have been built with NUMA support.
2021-11-06 15:15:27.451529: I tensorflow/core/common_runtime/pluggable_device/pluggable_device_factory.cc:271] Created TensorFlow device (/device:GPU:0 with 0 MB memory) -> physical PluggableDevice (device: 0, name: METAL, pci bus id: <undefined>)
Metal device set to: Apple M1
Import the Fashion MNIST training and test datasets into four NumPy arrays. Each image is 28 x 28 pixels.
fashion_mnist = tf.keras.datasets.fashion_mnist

(train_images, train_labels), (test_images, test_labels) = fashion_mnist.load_data()
The images are 28x28 NumPy arrays, with pixel values ranging from 0 to 255. The labels are an array of integers, ranging from 0 to 9. These correspond to the class of clothing the image represents:
| Label | Class |
|---|---|
| 0 | T-shirt/top |
| 1 | Trouser |
| 2 | Pullover |
| 3 | Dress |
| 4 | Coat |
| 5 | Sandal |
| 6 | Shirt |
| 7 | Sneaker |
| 8 | Bag |
| 9 | Ankle boot |
Each image is mapped to a single label. Since the class names are not included with the dataset, store them here to use later when plotting the images:
class_names = ['T-shirt/top', 'Trouser', 'Pullover', 'Dress', 'Coat',
               'Sandal', 'Shirt', 'Sneaker', 'Bag', 'Ankle boot']
train_images.shape
(60000, 28, 28)
len(train_labels)
60000
train_labels
array([9, 0, 0, ..., 3, 0, 5], dtype=uint8)
len(test_labels)
10000
test_images.shape
(10000, 28, 28)
Scale the images
The images have greyscale values, between 0 and 255. Hence scale the values, between 0 and 1.
train_images = train_images / 255.0

test_images = test_images / 255.0
Build the Model
The first layer in this network, tf.keras.layers.Flatten, transforms the format of the images from a two-dimensional array (of 28 by 28 pixels) to a one-dimensional array (of 28 * 28 = 784 pixels). After the pixels are flattened, the network consists of a sequence of two tf.keras.layers.Dense layers. These are densely connected, or fully connected, neural layers. The first Dense layer has 128 nodes (or neurons). The second (and last) layer returns a logits array with length of 10. Each node contains a score that indicates the current image belongs to one of the 10 classes.
model = tf.keras.Sequential([
    tf.keras.layers.Flatten(input_shape=(28, 28)),
    tf.keras.layers.Dense(128, activation='relu'),
    tf.keras.layers.Dense(10)
])
2021-11-06 15:15:28.055541: I tensorflow/core/common_runtime/pluggable_device/pluggable_device_factory.cc:305] Could not identify NUMA node of platform GPU ID 0, defaulting to 0. Your kernel may not have been built with NUMA support.
2021-11-06 15:15:28.055563: I tensorflow/core/common_runtime/pluggable_device/pluggable_device_factory.cc:271] Created TensorFlow device (/job:localhost/replica:0/task:0/device:GPU:0 with 0 MB memory) -> physical PluggableDevice (device: 0, name: METAL, pci bus id: <undefined>)
Compile the model
Before the model is ready for training, it needs a few more settings. These are added during the model's compile step:
Loss function —This measures how accurate the model is during training. You want to minimize this function to "steer" the model in the right direction. Optimizer — This is how the model is updated based on the data it sees and its loss function. Metrics — Used to monitor the training and testing steps. The following example uses accuracy, the fraction of the images that are correctly classified.
model.compile(optimizer='adam',
              loss=tf.keras.losses.SparseCategoricalCrossentropy(from_logits=True),
              metrics=['accuracy'])
Train the Model
To start training, call the model.fit method—so called because it "fits" the model to the training data:
model.fit(train_images, train_labels, epochs=10)
Epoch 1/10
   1/1875 [..............................] - ETA: 4:57 - loss: 2.6214 - accuracy: 0.0312
2021-11-06 15:15:28.396722: I tensorflow/compiler/mlir/mlir_graph_optimization_pass.cc:185] None of the MLIR Optimization Passes are enabled (registered 2)
2021-11-06 15:15:28.399850: W tensorflow/core/platform/profile_utils/cpu_utils.cc:128] Failed to get CPU frequency: 0 Hz
2021-11-06 15:15:28.498310: I tensorflow/core/grappler/optimizers/custom_graph_optimizer_registry.cc:112] Plugin optimizer for device_type GPU is enabled.
1875/1875 [==============================] - 6s 3ms/step - loss: 0.5037 - accuracy: 0.8223
Epoch 2/10
1875/1875 [==============================] - 5s 3ms/step - loss: 0.3759 - accuracy: 0.8636
Epoch 3/10
1875/1875 [==============================] - 5s 3ms/step - loss: 0.3366 - accuracy: 0.8767
Epoch 4/10
1875/1875 [==============================] - 5s 3ms/step - loss: 0.3116 - accuracy: 0.8856
Epoch 5/10
1875/1875 [==============================] - 5s 3ms/step - loss: 0.2915 - accuracy: 0.8919
Epoch 6/10
1875/1875 [==============================] - 5s 3ms/step - loss: 0.2787 - accuracy: 0.8962
Epoch 7/10
1875/1875 [==============================] - 5s 3ms/step - loss: 0.2668 - accuracy: 0.9010
Epoch 8/10
1875/1875 [==============================] - 5s 3ms/step - loss: 0.2541 - accuracy: 0.9054
Epoch 9/10
1875/1875 [==============================] - 5s 3ms/step - loss: 0.2481 - accuracy: 0.9073
Epoch 10/10
1875/1875 [==============================] - 5s 3ms/step - loss: 0.2371 - accuracy: 0.9114
<keras.callbacks.History at 0x14bea44f0>
Evaluate the model accuracy
Next, compare how the model performs on the test dataset:
test_loss, test_acc = model.evaluate(test_images,  test_labels, verbose=2)

print('\nTest accuracy:', test_acc)
2021-11-06 15:16:21.523738: I tensorflow/core/grappler/optimizers/custom_graph_optimizer_registry.cc:112] Plugin optimizer for device_type GPU is enabled.
313/313 - 1s - loss: 0.3318 - accuracy: 0.8857

Test accuracy: 0.8857000470161438
Convert TensorFlow model into a TensorFlow Lite model
model.summary()
Model: "sequential"
_________________________________________________________________
Layer (type)                 Output Shape              Param #
=================================================================
flatten (Flatten)            (None, 784)               0
_________________________________________________________________
dense (Dense)                (None, 128)               100480
_________________________________________________________________
dense_1 (Dense)              (None, 10)                1290
=================================================================
Total params: 101,770
Trainable params: 101,770
Non-trainable params: 0
_________________________________________________________________
This is just a very simple model to get the ball rolling!
export_dir = 'saved_model/1'

tf.saved_model.save(model, export_dir)

# Note: The warnings have something to so with software updates and should not cause any errors or prevent the code from running.
INFO:tensorflow:Assets written to: saved_model/1/assets
2021-11-06 15:16:22.274162: W tensorflow/python/util/util.cc:348] Sets are not currently considered sequences, but this may change in the future, so consider avoiding using them.
# Select mode of optimization
mode = "Speed"

if mode == 'Storage':
    optimization = tf.lite.Optimize.OPTIMIZE_FOR_SIZE
elif mode == 'Speed':
    optimization = tf.lite.Optimize.OPTIMIZE_FOR_LATENCY
else:
    optimization = tf.lite.Optimize.DEFAULT
Use the TFLiteConverter SavedModel API to initialise the converter. This generates a number of warnings, but they do not seem to affect the creation of the tflite model.
# To quantize the model on export, set the optimizations flag to optimize for size.
converter = tf.lite.TFLiteConverter.from_saved_model(export_dir)

# Set the optimzations
converter.optimizations = [tf.lite.Optimize.DEFAULT]
#tflite_quant_model = converter.convert()

# Invoke the converter to finally generate the TFLite model
tflite_model = converter.convert()
2021-11-06 15:16:22.537321: W tensorflow/compiler/mlir/lite/python/tf_tfl_flatbuffer_helpers.cc:354] Ignored drop_control_dependency.
2021-11-06 15:16:22.537323: W tensorflow/compiler/mlir/lite/python/tf_tfl_flatbuffer_helpers.cc:360] Ignored change_concat_input_ranges.
2021-11-06 15:16:22.538206: I tensorflow/cc/saved_model/reader.cc:38] Reading SavedModel from: saved_model/1
2021-11-06 15:16:22.538875: I tensorflow/cc/saved_model/reader.cc:90] Reading meta graph with tags { serve }
2021-11-06 15:16:22.538879: I tensorflow/cc/saved_model/reader.cc:132] Reading SavedModel debug info (if present) from: saved_model/1
2021-11-06 15:16:22.540853: I tensorflow/cc/saved_model/loader.cc:211] Restoring SavedModel bundle.
2021-11-06 15:16:22.555567: I tensorflow/cc/saved_model/loader.cc:195] Running initialization op on SavedModel bundle at path: saved_model/1
2021-11-06 15:16:22.557667: I tensorflow/cc/saved_model/loader.cc:283] SavedModel load for tags { serve }; Status: success: OK. Took 19461 microseconds.
2021-11-06 15:16:22.572335: I tensorflow/compiler/mlir/tensorflow/utils/dump_mlir_util.cc:210] disabling MLIR crash reproducer, set env var `MLIR_CRASH_REPRODUCER_DIRECTORY` to enable.
# Save the tflite model i.e write it out as a tflite file.
# N.B In this instance the model is saved as a 104KB file.

tflite_models_dir = pathlib.Path("./mnist_tflite_models/")
tflite_models_dir.mkdir(exist_ok=True, parents=True)

tflite_model_file = pathlib.Path(tflite_models_dir/'model.tflite')
tflite_model_file.write_bytes(tflite_model)
103952
# Show the model size
#ls -lh {tflite_models_dir}
Run the TFLite model
Run the TensorFlow Lite model using the Python TensorFlow Lite Interpreter.
# Load the model into an interpreter

interpreter = tf.lite.Interpreter(model_path=str(tflite_model_file))
interpreter.allocate_tensors()
Test the model on one image
test_image = np.expand_dims(test_images[0], axis=0).astype(np.float32)

input_index = interpreter.get_input_details()[0]["index"]
output_index = interpreter.get_output_details()[0]["index"]

interpreter.set_tensor(input_index, test_image)
interpreter.invoke()
predictions = interpreter.get_tensor(output_index)
plt.imshow(test_images[0])
template = "True:{true}, predicted:{predict}"
_ = plt.title(template.format(true= str(test_labels[0]),
                              predict=str(np.argmax(predictions[0]))))
plt.grid(False)

class_names
['T-shirt/top',
 'Trouser',
 'Pullover',
 'Dress',
 'Coat',
 'Sandal',
 'Shirt',
 'Sneaker',
 'Bag',
 'Ankle boot']
# A helper function to evaluate the TF Lite model using "test" dataset.
def evaluate_model(interpreter):
  input_index = interpreter.get_input_details()[0]["index"]
  output_index = interpreter.get_output_details()[0]["index"]

  # Run predictions on every image in the "test" dataset.
  prediction_digits = []
  for test_image in test_images:
    # Pre-processing: add batch dimension and convert to float32 to match with
    # the model's input data format.
    test_image = np.expand_dims(test_image, axis=0).astype(np.float32)
    interpreter.set_tensor(input_index, test_image)

    # Run inference.
    interpreter.invoke()

    # Post-processing: remove batch dimension and find the digit with highest
    # probability.
    output = interpreter.tensor(output_index)
    digit = np.argmax(output()[0])
    prediction_digits.append(digit)

  # Compare prediction results with ground truth labels to calculate accuracy.
  accurate_count = 0
  for index in range(len(prediction_digits)):
    if prediction_digits[index] == test_labels[index]:
      accurate_count += 1
  accuracy = accurate_count * 1.0 / len(prediction_digits)

  return accuracy
print(evaluate_model(interpreter))
0.8852

TensorFlow model accuracy: 0.8822
TFLite model accuracy tends to vary between 0.8462 and 0.8852